Realized I had never posted the story about losing my Father Duane. Chair is doing just fine, use it every day.
January 22-09
Dads old chair just gave out, came home one weekend and the
recliner mechanism had broke. The chair meant a lot to Dad,
not in a sentimental way but because he just did not get
around good anymore mostly he sat in his chair and watched,
watched the news, watched the neighbors come and go, watched
the trains headed north with coal.
There was another in the basement, my nephew Travis and I
were tasked to bring it up, we plunked it into place. It was
far nicer looking then the old one, rich brown leather. No
swivel though, that and it sat low, hard for Dad to get out
of it. Just four stout legs with the reclining feature.
Even in his younger years, back when he was putting in long
hours building his business Dad appreciated a good chair.
Now when he needed one the most it did not have a swivel. He
could buy another but not today, He was not a patient man.
I went to the garage, found some plywood then tore the
swivel off his old chair and brought them both into the
living room. Seeing the possibilities Dad perked right up,
excited now he told me where some screws were, directed me
to the saw and his drill. It went quite well, Dad watched
every move made, offered suggestions. My sister Laura was
worried, worried when we ran dri-wall screws into the nice
legs, worried the extra four inches would dump Dad over when
he tilted it back. Dad and I weren't concerned with pretty,
just function, plywood and two by fours screwed together, no
mitered ends, no sanding or staining. When finished it
looked like a lumber truck had crashed.
. Dad was ecstatic. He just could not get over how well it
worked.
Every Sunday I came home now, every Sunday when leaving I
would pause at the door where Dad sat in his chair, grasp
his hand and tell him I loved him, he could never say it
back.
Later as he got weaker and it was more difficult for him to
reach the phone I built him a shelf alongside the chair arm,
we screwed it right to the side arm, my sister Laura again
winced, this time as we drove screws right through the
leather on the sides. We told her, told her not only was it
just a used chair, it was Dad's used chair, and if he wanted
to drive screws through it was is business. Screwed the
phone right down to the shelf also, big screws, ugly screws.
Dad loved it.
I noticed now when I was preparing to go Dad would look at
me and get his hand ready, and when I grasped it he would
hold on a little longer, our eyes would meet and feelings
would flow between us, still the words could not come.
Time passed and now even the chair was not a comfort, he was
getting sores and had trouble finding a position did not
hurt. Then the day came he could no longer make it to his
chair. My sister Karen the nurse came for the week, I showed
up Friday evening to take my sons place, my sister Laura was
getting ready to leave. Dad seemed OK but strangely both
Laura and my son Alan kept dragging their feet and ended up
staying also.
In the early morning Dad started to slip away from us, oddly
the kitchen drain picked this occasion to plug, Mom was in
the room with us, not altogether with it, sort of groggy but
still quipping about what we were going to have for supper.
We all sat on the bed and rubbed and held Dad, he pursed his
lips, we thought to say something, no he wanted Mom to kiss
him, one last time. Then he was gone. We sat with him for
some time. It felt right to be there, not hard like you
might think. I was so glad Karen had came down, and so glad
Laura and Alan had stayed.. We all felt very close,as close
as we ever have.
In time we gathered in the kitchen, the hospice nurse Marge
showed up followed by the fellow from the funeral home, they
put Dad on a gurney, I helped them carry him out past his
chair and place him in the hearse.
He never did say it, nor did he have to, his eyes said it
when he looked at me waiting with his outstretched hand, in
his custom built chair.
Sunday, December 23, 2018
Thursday, December 20, 2018
The Littlest Christmas tree.
When you are young no time is more
special then Christmas. How I and my three siblings Larry, Karen and
Laura looked forward to it.
In our small town of Lester Iowa the
season kicked off when the Christmas trees arrived at J.D.
Chamberlain's lumber yard and hardware store. J.D.s was a fixture on
main street his main building being cement block which my Father told
me were cast by hand from molds mail ordered from Sears and Roebuck
The trees arrived and were set out in front for all to see, my
youngest sister Karen and I begged our father Duane to buy one.
I do not recall how long it took to
persuade him, days or weeks, but I do remember looking them all over
with Dad in tow. A small one caught our eye, short needled not over
four and a half or five foot tall. Dad grabbed it with a strong hand
stamping the trunk on the pavement to shake out the snow and get and
idea of it's spread. We fell in love with the little tree.
Once home we set it up in the corner of
our living room and over the next day it's branches spread.
Typically one side of a tree has a bald
spot, a missing branch. Common practice is to set the ugly side to
the wall. Our little tree was absolutely perfect no matter from what
side it was viewed. Karen and I being the youngest were so proud of
it. We simply beamed when company came, could not wait to tell the
story of finding our tree, to show them how perfect it was. I
remember Dad and Mom smiling as we told our story.
At the time I thought they were proud
of the tree also, now at 66 with children, and grandchildren, of my
own, I realize they were not so much proud of the tree but of us kids
for being so happy with it, proud of us being so pleased with such a
simply thing.
Christmas over our little tree was set
outside in the snow where it was covered with popcorn strings the the
ground around it covered with old bread heals, this for the birds to
feast on.
For the past two weeks running up to
this Christmas of 2017 not a day has gone by I don’t think of our
little tree and how special it made our family’s Christmas back in
1958.
Times, events, as a child, are like
seeds scattered on the ground. Many never germinate, others sprout
soon to fade away. But sometimes the least likely grow and grow into
a wonderful memory we can carry and cherish our entire life.
It is the time of year to remember one
of our most important jobs is to scatter those seeds, and to not be
discouraged when sometimes they do not grow, to have faith, absolute
faith, that some of them, as always, will live on long after we are
gone. Merry Christmas to all.
Wednesday, December 19, 2018
Building a home built tractor.

Plan on getting some pictures taken to go along with the following text but for know this is what I have.
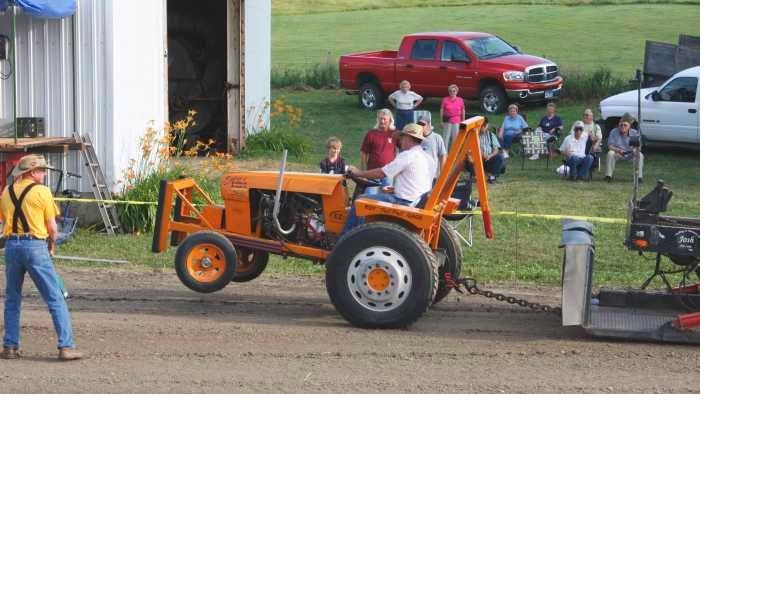
Plan on getting some pictures taken to go along with the following text but for know this is what I have.
I always admired my Father Duane’s
ability to fashion something workable from others scrap. Feed mills,
payloaders, semi trailers, he was simply a wizard.
Some twenty odd years ago I built a
small tractor which worked out better then I could have imagined. We
have used it to spray, push cars into the shop, mow the lawn, pull at
the local tractor pull, lift up motors and other heavy items with the
back cherry picker, and most importantly, take nice long drives on
gravel roads during warm Iowa summer evenings.
I would like to share my design with
you and in particular point out the solution I stumbled onto which
resolved the problem of multiple transmissions which stretch the
drive-line out in length and make most home-built designs awkward
with the engine hanging out over the front axle and the back
transmission under your butt.
Simply put I incorporated a transverse
frt. wheel drive trans-axle and engine and turned it around so the
engine face forward. OK, now we have one drive axle pointing forward
and another pointing backwards both hanging off to the right side of
the center line.
As you only need to use one of the
axles you will have to split the trans-axle and weld the spider gears
up in the internal differential. Spiders welded up you can pull out
the axle pointing to the rear and plug the hole left in the case. I
simply fashioned a piece of aluminum which fit into the seal and
then drove the seal into place.
The engine and drive-line I used came
from a1984 Nissan Sentra. A garden variety 1600CC SOHC with a five
speed manual trans-axle it was an engine , and trans-axle, I was
familiar with and at the time of the build easy and cheap to procure.
Lets take a look at just what it gives
us. A nice short little four cylinder overhead cam engine which runs
smooth and is very reliable coupled with a quiet easy to shift fully
synchronized five speed trans-axle Also tucked into the gear box is
a final drive set which further reduces the rpm by about a 3.5 to one
ratio.
Hi-Lo range
1984 Nissan 4x4 pickups used a
divorced transfer case which rather then hanging on the back of the
transmission were mounted to frame rail with a drive-shaft from the
transmission powering it. Mounting one of these on the right hand
frame rail in front of the engine allowed me to run the drive shaft
from the trans-axle right into the transfer case then hook up to the
output shaft which would have originally ran to the front axle with
another drive-shaft which then had a straight shot at the nine inch
Ford rear end in the back of the tractor.
Wow! What a difference this layout
makes. I was able to set the engine and trans-axle in place and
simply slide it back and fourth on the frame rails to a spot which
gave the best balance. And talk about luck. I was able to use one of
the stock drive-axles from the Nissan to couple to the transfer case
and then the stock 84 Nissan pickup rear drive-shaft to couple to the
nine inch Ford rear end.
All I had to do with the back
driveshaft was hybridize the rear u-joint, the front axle shaft
simply required an adaptor to couple to the transfer case.
The frame.
I used 3x3 3/16s square tubing .
Tricky part with the frame is you need to know the height of the back
and and the front axle. Better get the front axle and the rear end
set up with the tires you plan on using. Your front axle is going to
have to a pivot a few degrees so you need to determine how much
clearance you need between the top of the axle and the bottom of the
frame members. See specifications.
For me all that was required was to
overlap the frame rails just ahead of the back axle. This gave us the
three inch drop needed to keep everything level. See pictures.
One little tweak which worked out well.
Before I tacked the frame together I laid the rails up in the drill
press and put some holes through the rail centers both vertical and
horizontal. Believe I used a ¾ inch bit. Holes in place I fitted
them with short pieces of ½ inch black pipe welded into place and
then ground flush with the frame surface. This gives nice mounting
points to bolt any future attachments to. With the pipes welded into
place you can cinch the bolts down tight without worrying about
collapsing the frame. Much easier to do while the individual frame
members can be placed in a drill press.
Rear end
The differential used was a Ford nine
inch from a sixties something Ford pickup. A nice thing about the
nine inch Ford is that ratios are available all the way down to about
6.5 to one. Initially went with the 6.5 to 1 set. Worked good, pulled
tractor pulls in second gear low range. By over reving the engine to
about 7 or 7.5 K RPM we were able to top 50 MPH in high high. Not
recommended, but felt we had to do it once.
The width of the rear end was good the
way it was, no narrowing of the housing or axle shortening needed. I
will caution the back wheel studs stick out a little further then the
widest point of the tires. Yo get used t it and not a problem.
Certainly makes a mess though if you get to close to a woven wire
fence.
I will mention the nine inch Ford will
do anything within reason, very easy to work on and set up. That
being said if we got a tacky track at the tractor pull it would crack
the spider gears like walnuts. I was able to locate a twin pinon nine
inch differential which has four rather then two spider gears. Since
making the switch we have had no further problems . If I was building
another one though I would move up to a fourteen bolt GM rear end.
When building the tractor I assumed
the weak link was going to be the welded spider gears in the Sentra
trans-axle. These are not much larger then a silver dollar. I was so
in love with the drive-line layout I could not resist going against
my better judgment and going forward with the build. The last thing I
expected problems with was the nine inch ford.
The little spiders in the Sentra
trans-axle have never given a bit of trouble whereas those Ford
spiders caught between all the reduction in the drive-line and the
height of those tall semi tires have not. I might also note the
Sentra clutch, no bigger then a pie plate, has been replaced once in
twenty some years and am sure if it wasn’t for starting out those
heavy sleds at the pulls the original would still be doing fine.
Steering
Used a tilt steering column out of a
80s GM car. As you can see in the pictures rather then mount the
column to the frame I mounted it to the trans-axle. This has worked
well. I had thought I would use a steering box below the column and
then transfer the motion forward via a drag link to a pivot which
would hook to the tie rod between the two front wheels.
What we ended up mounting a power
steering rack from a mid eighties GM front wheel drive car parallel
to the frame. The steering column hooks up to the rack with a
knuckle, the one tie rod end is not used and the one pointing forward
attaches to the aforementioned pivot. Using the rack eliminates the
use of a drag link. This has worked well. We mounted two power
steering pumps both from mid eighty vintage Nissan Sentras. One pump
handles the power steering while another taps into a larger welded
reservoir which takes care of the rear lift cylinder.
Wheels.
My father had a small fleet of semi
trucks. The aluminum Bud wheels they use are scraped if they develop
a crack. For the first five years they are warrantied after that
they are simple pitched. Dad had a couple with cracks which I felt
comfortable using due to the tractors light weight and low air
pressure, ten lbs. To adapt them we used ½ plate steel. Takes some
time to get everything centered up and drilled but using the five
bolt axle flange, with the studs knocked out of it, for a pattern on
the small circle and the truck rim for a pattern on the large circle
it worked.
My Friend Larry who at the time ran a
machine shop turned the adapter plate into a circle with his lathe.
He also turned the center to fit the hub of the axle. The wheels,
tires and adapters have never given any problem, following from
behind they run true. Note rather then bevel the holes in the adapter
to match bevel of the lug nuts I simply turned the lug nuts around.
Also note although I put ten holes in the outer diameter lug nut
holes when I started fitting the studs I realized on my light little
rig ten big studs was overkill so we just used every other one.
Front Axle
I spent the better part of a weekend
building the first front axle. Not happy with it when done I threw it
out and started over this time using a set of front spindles of an
old Datsun 620 pickup truck along with some 3X3 by ¼ inch square
tubing. I doubt you would be able to find a set of them anywhere now
as all those old Datsuns have rusted away. That being said the
Datsun spindles mated with a pair of wheels from a Dodge D-50 have
worked well.
Setting up your Ackermen angle.
My Father always preached setting up
the Ackermen angle. When you turn the outside wheel has to turn a
lesser angle as it is making a wider turn. If your steering arm tie
rod end holes are both straight back from the spindle center line
when you turn both wheels will turn the same angle the outer tire
being partially drug around the corner. You can feel this when
driving as it will feel like the brakes are being applied on corners,
the tighter the turn the more noticeable. Also, the shorter the
wheelbase the more noticeable.
Dad said to set it up properly draw a
straight line from the center of the back axle through the spindle,
or king pin, center line. Drawing the line on each side you end up
with a vee. Now just make sure where your tie rod end hooks to the
steering arm is on this imaginary line. Interestingly if you extend
the line past the center of the king pin so it goes forward of the
frt. axle you can hook the tie rod up there also.
Look at some trucks or even cars, some
have the tie rods in frt. of the axle, some in back but if you look
they all will be set on that imaginary line. I have heard on some
heavy trucks they have different steering arms available for
different wheelbases.
I got in a hurry and did not pay close
attention to my steering arms, simply left them as they were.. Sure
enough, with my shorter wheel base I could coast along, turn the
wheel and feel everything bind up bringing me to a stop. Some cutting
and welding to put my tie rod connections on the magic line and it
rolls very smooth during even tight turns. Remarkable difference.
Note most of the steering spindles and arms are malleable cast steel,
not cast iron. As such they weld up nice. When I needed a good
tapered hole to hook up the drag link to the tie rod it was a simple
matter of going to the junk yard and cutting an end off a 80s
something GM front wheel drive steering arm and welding it into
place.
Radiator
Hard to find an automotive radiator
narrow enough. Mine came off a 1980 water cooled Volkswagen Fox with
a 1800 CC motor Nice package in that the cooling fan is controlled by
a temp sender which is screwed right into the radiator. This is one
of the few cooling senders or switches which has heavy enough
contacts it can carry the load of the fan without a relay. just power
in and power back out. This package has been trouble free.
Roll over protection.
The ROP is simply built with square
tubing. I angled it back about 14 degrees. It has ½ inch thick pads
on the bottom which bolt to the base. This allows the ROP to be
unbolted if need be. The cherry picker as you can see is built off
the ROPs. Also has a set of lift arms and a center link for three
point use. Not used much now but for several years I mowed with it.
Had an older 5 foot three point mower which I converted from PTO to
its separate engine a 16 hp Briggs Van Guard. A chain hooked up from
the cherry picker arm to the mower deck which allowed it to be
lifted about a foot. Always worked good with the exception of being
awkward around trees.
Fenders.
When building the tractor I figured the
fenders would be the big easy. I planed to buy a pair of used flat
top tractor fenders and bolt them up. Ready for them I found used
scarce and when found expensive. Plan B worked out well though. Made
use of some ten inch channel iron and cut one edge off. I welded on a
piece of 3X3 angle iron to widen it out then as I remember welded
some steel to the frt. And back edges to add some more depth then
took string from the center of the axle and drew a arc on the fenders
edge and cut it off with a torch.
Using some 5/16 steel rod I put it on
the fenders edges to give a nice rolled finish to it. As I spotted
in place we used the torch to heat it so I could make the tight
corners. Once in place welded it on solid with 1/16 inch rod then
went over it with a die grinder and three inch 36 grit sanding pads
to smooth it all out.
I like the fenders, they are sturdy and
we often use them to stand on when spraying with a hand wand.
Fuel tank
For a gas tank we used a 6 gallon
marine tank. Located under the seat it sits loose with a ring of
5/16 steel rod welded to the floor to keep it in place. You can grab
the tank with your hand and lift up on it to see how much fuel is
left. Simple is good. Five gallons of fuel lasts forever.
Hood.
I had a lot of fun playing around with
different hood designs. I ended up using a pair of front fenders off
a late seventies Dodge D-50. You can see in the pictures they were
trimmed right above the top of the wheel opening. We then used a
piece of common steel for the center section. The hood tips forward.
I am not a body man but am happy with
the way it turned out.
Dash
The dash is formed of 1/8 inch flat
steel. How to make those nice round curves. I stumbled on to this
trick. I have a shop press which has a base of steel channel irons on
edge three inches apart. Lay the flat steel across them then take a
good heavy piece of heavy angle iron and place its sharp edge against
the flat steel parallel with three inch gap between the press base,
now bring the ram down into the angle of the angle iron and start
pumping. The sharp edge of the angle iron pushing through the three
inch gap will form the smoothest bend in the flat steel you could ask
for.
Spider gears
Welding the spider gears. I asked about
welding spiders on one of my auto tech sites, iATN. A ton of
responses with a number of different techniques. The take away, they
all work. I simply went down to the local farm store, bought some
cast iron rod and burned it together, no finesse to it.
Choosing an engine and trans-axle.
At the time of building mine non
computerized car engines were plentiful. Today finding a good one is
hard. This means you may have to make use of a car engine which is
fuel injected and computer controlled. A lot more wires but fuel
injected is nice. There are two kinds. Pre 1995 and post 1995 . 1995
engines and later are called OBD 2 . OBD 2 cars have advanced
diagnostics, more inputs, more outputs, more wires. Some such as the
Evap. system can be discarded. Of course this means you will always
have codes set in your computer so a check engine light is not gong
to do you much good as it will always be on. Other systems such as
fuel control, ignition and such will have to be maintained.
Just keep in mind when you find your
donor motor and transmission you will want not only the engine and
trans-axle but the engine control module, or ECM , and all the
wiring which goes with it.
You could do a lot worse then finding
an early nineties four cylinder pre-OBD Toyota..
A decent scan tool and a good wiring
diagram will be needed to sort through everything. Once hooked up and
properly wired no reason it shouldn’t be trouble free. A good
friend who is an auto tech with access to online wiring diagrams and
service information would be very useful.
Automatic trans-axles?
What about an automatic trans-axle? I
believe it would work good and stand up well. The hardest part would
be pulling the automatic all apart to get to the spider gears and
then getting it back together without screwing something up.
Automatics are easy to work on, if that is what you work on all the
time. For the rest of us it can be trying. I have another project I
have been working on, an articulated loader which makes use of a G.M.
three speed automatic trans-axle. I welded the spiders in it, they
are the very last thing to come out of the case, everything else has
to come out to access them. So far, knock on wood, it is working
well.
Building one today.
Let me tell you how easy it could be. I
spent, “wasted”, a bunch of time trying to figure out where
everything went, the dimensions needed for the frame, how much offset
in the frame, how everything would fit. Doing one today I would
simply start with a frame the dimensions of mine. I would use the
three inch overlap knowing it would be perfect for 14 inch front
tires and semi truck rear tires. Once I got the frame rails cut I
would spot weld the the frame members together. Next I would build
adapters for the rear truck tires and mount them up to a rear end and
spot weld the rear end to the frame. Next I would grab an old wheel
barrow wheel and build a fork for it and spot weld the fork to the
front of the frame giving me a rolling chassis.
Once you have a rolling chassis it is
much easier to deal with. Yes, it will be a lot of work but once you
have it roughed out and rolling on wheels you can break it down to
one project at a time. One key point I cant stress enough, spot weld
everything until you are sure how everything is going to fit
together, only then do your final welding.
So, how does it work? A slick nickel. I
have a little thirty horse L series Kubota. With it's ag tires it is
pretty lumpy on the road, only goes 12 MPH. Straight cut gears in the
transmission are loud. No synchronizers so you have to pick out your
gear before you start, no shifting on the fly.
Compare with the home-built. Tires are
smoother for a much nicer ride, the transmission is synchronized, and
quiet as a mouse. You can run around town at twenty MPH without over
revving, smooth as can be.
My grandson Evan loves going for
evening rides in the summer time. We have a lot of gravel roads here
in Iowa that have little traffic. We often go out ten mile or even
fifteen before turning back.
During the county fair we put a
straight pipe on it and go tractor pulling. If the track is tacky we
can get the wheels up and, in second gear low range, pull the motor
right into the dirt. The front push bumper makes moving cars and
trucks around at work a piece of cake. Always our choice for spraying
with a spray bar up front and hose and wand in the back.
Despite the rear end not being posi
traction you have to work pretty hard to get it stuck.
Yes, it takes some time to get it all
together. But of all the projects I have done this is the one I
enjoyed building the most, and the one I have got the most use and
enjoyment out of once built. Never been any regrets for the time
spent on or with it.
Subscribe to:
Posts (Atom)
